In my last blog: Basic Tools for Jewelry Making, I went over round nose, flat nose, chain nose pliers along with flush cutters and memory wire shears; this blog will delve into books and tools I use specifically for working with wire W and metal M.
I do not do any soldering so I did not include any tools for this medium.
BOOKS W
Sharilynn Miller is, by far, my most favorite mentor when it comes to learning about wire. Her books are easy to understand and the images are fantastic!
"Bead on a Wire" is the first book I ever purchased, and it goes over the basics, along with projects to develop your new learned skills.

Here are her other books that I have:


Another great book for learning how to make bangles from wire is:

BOOKS M

This book is a must-have for any of you who will be working with metal - Mark Lareau goes over tools, how to saw, stamp and solder.
MAGAZINES W M

TOOL MAGIC

This is actually a thick white rubbery substance that coats your pliers so that you don't mar the metals that you are working on. It has a very strong odor so be sure to use in a ventilated area.
How To Use:
Stir the substance until the oil is not sitting on top and then dip the tips of your pliers in, avoiding the joint. Stand pliers upright and let dry overnight. Voilà - coated pliers!
Why this instead of nylon coated? Nylon coated flat nose pliers work well enough and I actually prefer nylon over Tool Magic for flat nose pliers as the wire slips more readily between the jaws of the nylon coated pliers, but nylon coated round nose pliers? Argh! Tool Magic is definitely better as you have a better grip on the wire.
SAFETY GLASSES

Any time you work with wire or metal, always don on a pair of safety glasses. I wear regular glasses and also have a pair of safety glasses - which I don't always wear, BUT it is important to protect your eyes from flying bits of wire and metal.
MASKS
If you will be working with a Dremel or Flexshaft, I'd highly recommend putting on a mask to protect your lungs.
FLAT/HALF ROUND and SQUARE MANDREL FORMING PLIERS W

These two types of pliers are great when you want to make multiple wire strand bracelets. It's easier to use these as they are specifically designed for this type of wire bending.
STEPPED WRAP and TAP PLIERS W

I bought these first for wrapping wire until I bought the bail-forming pliers. The wrap and tap pliers are ideal for hollow or patterned stock. Simply wrap the wire or ring stock around the barrel shapes and then tap gently with a mallet.
BAIL FORMING PLIERS W

Love, love, LOVE these pliers!!! These pliers have six different sized barrels in 2 and 3mm, 3.5 and 5.5mm, 7 and 9mm. You can make a variety of consistent loops, S-hooks, bails, etc.
My bail-forming pliers are from Euro Tool.
FILES W, M


Even if you have a Dremel or Flex Shaft, you will still need some high-quality files on hand. Which ones to get? My first file was a Craftsman file, and I still use it now! I'd suggest getting a large flat file and also a set of needle files: round, half-round, and barrette.
When using files, it is best to add a coating of lubricant to keep file teeth sharp and always file in one direction. If you are using diamond encrusted titanium files, you can file in both directions, but I'd still suggest one direction for optimal results.
I'd also recommend getting a file-cleaning brush and always clean your files after using them.
SANDING and POLISHING W M

In the image above, there are wet-dry sanding papers, sanding blocks/needles and the white squares are Pro-Polishing pads.
When buying sanding paper, needles, or blocks make sure you get a variety of grits.
HAMMERS and MALLETS W, M
Buy yourself a chasing hammer and rubber mallet to start out. You will use the chasing hammer to work-harden your wire, and you can also add a beautiful texture by using the ball end. A mallet also work-hardens wire without marring the metal.
When choosing a mallet - go for weight and durability. I have a Craftsman that has both a nylon head and hard rubber head. (I have bought other mallets in the past that were too light to do anything with.)
• Chasing Hammer, W

This type of hammer has one flat faced head and one round head. The fat surface is used for chasing other tools and to work-harden wire. The round end is for riveting, peening, adding texture and more.
If you are going to use metal stamps, I'd suggest buying another chasing hammer for this type of work or getting a copper or brass head hammer. By using your chasing hammer for stamps and then turning around and using it to harden wire - it'll produce nicks in the wire. (Not pretty.)
• Ball Peen Hammer, W M

This hammer has two ends: one flat face and one half-domed face. Use the flat end for striking and the half-domed end for riveting, shaping and spreading unhardened metal.
• Riveting Hammer, W

This hammer is specifically for riveting.
• Texturing Hammer, W M

Get a hammer that has multiple faces with different patterns. There are some hammers without interchangeable faces, and you can certainly get these too, but the ones with the interchangeable faces are awesome! Simply screw on the patterned face you want and voila - instant texture.
• Brass or Copper Head Hammer, M

These hammers are used to reduce sparks when working with gold and silver. I use my brass head hammer for metal stamps.
• Rawhide Mallet W

This mallet is very lightweight and is great for hammering rings or bracelets on a mandrel.
• Nylon/Rubber Head Mallet W M

STEEL BENCH BLOCK

When hammering, you want to hammer on a strong sturdy surface hence the steel bench block. You can also use a sandbag underneath the steel bench block so that the block doesn't move around.
It is not recommended to use the sandbag underneath the block when you are stamping. Your stamp will not produce a sharp image.
DAPPING BLOCK and DAPPING PUNCH SET M

A dapping block is used to shape softer metals into half rounds by placing the metal into the concave depressions and striking the hammer on the dapping punch. These come in either steel or wood.
I bought mine by accident, thinking it was a disk cutter, but have used it quite a bit.
DISK CUTTER, M

These come in multiple shapes now: round, oval, square, heart, star, etc. You definitely want to use some lubricant when cutting with these. You also need a chasing hammer or brass/copper head hammer and a steel bench block.
How To Use: place the metal in the groove (remove all the punches) and then coat the cutting edge of the punch with lubricant. After the sheet of metal is in the groove, strike the punch with a hard blow and then remove the metal sheet. Strike the punch again so it goes through the hole.
VICES and ANVILS M W
• A VISE has two jaws that hold metal or wire in a stronghold grip. I'd recommend getting a table vise that swivels. Some vices come with an avil but I don't think this is necessary as long as you have a steel bench block.

• ANVIL- these usually have a flat surface for hammering metal and wire along with a horned end for shaping and forming.

• BENCH PIN COMBO - this clamps to your work surface and has a slotted wood bench pin for use in sawing and/or filing, a ring and bracelet mandrel and also the steel base allows you to hammer components.

JEWELER'S SAW and BLADES M


Before using these - watch video tutorials and buy quality saw blades, like Laser from Rio Grande. Plus practice on cheap sheet metal before using semi-precious or precious metals.
There is a finesse involved when sawing... it can be frustrating, but stick with it!
ROTARY TUMBLER W M

The final stage of polishing your metal is with a rotary tumbler. You will need these as well:
• Burnishing compound (Rio Grande)
• Stainless Steel Shot Mix - 2lbs
• Distilled Water
STEEL WOOL W M

Steel wool is inexpensive and works like a charm for cleaning wire and metal. Plus the steel wool also work-hardens wire too.
WIRE GAUGE W M

This simple tool measures wire and sheet metal thickness by the gauge. Important to have when you are unsure of what the gauge is of the wire or sheet metal you are working on.
WIRE ROUNDER W

If you get this, buy the type that has a pin vise so you can exchange the wire-rounding cup burrs. This tool is very helpful for rounding the ends of cut wire as filing the ends will only make them flat, whereas by using this tool - you will have beautiful rounded wire ends.
WIG JIG W

This interesting tool has an acrylic or aluminum base with lots of tiny holes in a square or circular fashion. The pegs are inserted into the holes for repetitive wire patterns.
You can check out the website, https://www.wigjig.com/wigjigs/1674-wigjig-templates for hundreds of free pattern templates.
COILING GIZMO W

Between the regular and deluxe models, get the latter as there are more rod diameters to choose from. You can either put this in a vise or C-clamp.
CENTER PUNCH and SCRIBE M

Left to right: Center Punch and Scribe
A center punch is used to make an indentation in metal for drilling or you can also use a pair of hole punch pliers.
A scribe is used to mark metal for either sawing or cutting. You can also use a Sharpie marker but the "permanent" ink tends to rub off at the worst times.
WIRE TWISTER W

You will need a vise with these locking wire twisters, or you can use a drill to twist wire quicker. To use the locking wire twisters: simply place wire ends in vise and the other end, folded over, into the jaws of the locking pliers. Lock the handles in place and then standing with the wires taut, pull out knob and hold pliers. Repeat until one end breaks off. I tend to just sprint the pliers in my hand as the knob on these pliers doesn't work well with higher number gauges.
BENCH KNIFE W

This knife is handy when spreading wires.
WOODEN RING CLAMP M

This doo-dad is great for holding small components for drilling, filing and polishing. It has one square end and the other end is rounded. The wedge keeps your component in place. (Mine has leather inside both ends.)
HOLE PUNCH PLIERS and TOOL M

These above tools are for punching holes in softer metals. If you are going to punch holes in stronger metals, I'd suggest drilling the holes. These tools have replacement pins.
STEEL STAMPS M

Steel stamps come in letters, numbers, punctuation marks and whimsical characters. The stamp to the left has a purple Sharpie mark shown (all of my stamps have this) to show me which direction to use the stamp. I'd suggest marking your stamps as such so you don't accidentally stamp upside down.

DREMEL or FOREDOM

I have a Dremel that I'm still learning all of its uses. I bought this over a Foredom because of the price, and also because Dremel attachments are sold everywhere. Here's a great article on Dremel vs Foredom: http://www.bonejeweler.com/2014/11/dremel-or-foredom/
VIKING KNIT TOOL W
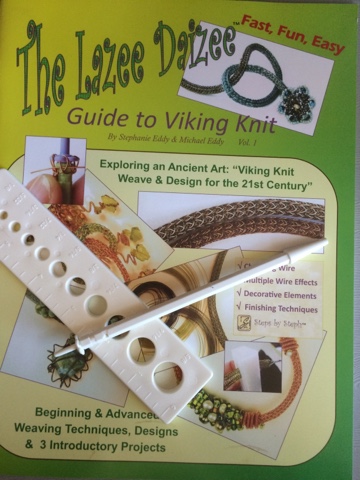
Viking knit is a type of knot knitting done with wire. There are several tools used for Viking knitting:
• Lazee Daizee wire weaving rod
• Draw plate and felted cloth
• Pin tool
• Lazee Daizee book
I'm sure there are lots more tools out there for working with both metal and wire, but these are the tools I use.
LIVER OF SULFUR W M

These two products work in the same way: adding a patina to your finished metal and wire projects. Read the directions and use in a well-ventilated area as the odor of sulfur smells like rotten eggs. Peeewww!
#ToolsForWire #ToolsForMetalsmithing #WireAndMetalsmithingTools
Next Up: Wired in Jewelry Wire
***ADDITIONAL BLOG MATERIAL***
"The Workbench Guide to Jewelry Techniques" by Anastasia Young IS a complete and very thorough book of everything you could possibly ever imagine.

No comments:
Post a Comment