Thursday, October 29, 2015

Basic Tools for Jewelry Making

A gal asked me if I had any tips on tools, supplies and the like for creating jewelry, and I thought to myself, 'Huh, this would make a great blog topic.'

So before I begin talking about the basic tools for jewelry making, I thought it might be nice to go over the actual anatomy of pliers...

Pliers can be made with differing types of steel along with different types of joints. The most important aspect of the pliers will be the construction: this will tell you the quality of the pliers. 

     CONSTRUCTION 
     • Forged is the highest quality you can get. These type of pliers are forged from a rod of tool steel and are work hardened as the metal is compressed and shaped. Then the pliers are tempered to prevent brittleness and produce the best combination of durability and strength. 
     • Cast: these pliers are formed in a mold made from molten metal and are not tempered.
     • Stamped: these type of pliers are made from a sheet of metal; they're the cheapest in both cost and quality.

     JOINTS
     • Box: 

     One half of the pliers joint surrounds the other half, and the pivot is hidden within. This type of joint holds alignment far longer than a lap joint but limits the opening of the jaws.

     • Lap:

     A lap joint has one half of the pliers joint overlapping the other half, and a pivot or screw is set through both halves.

     HANDLES
     Did you know that when you grip a pair of pliers, you are using over 40 muscles? That's a lot of muscles at work! It is imperative to get pliers with ergonomic handles so that they conform to the shape of your hand. I'd recommend getting pliers that have either soft plastic or foam handles.

     COMPOSITION 
     High-carbon or high-chrome alloy steel is the highest quality steel that produces the longest-lasting pliers and cutters. Yes, they are priced more significantly than hardened tool steel, but they are worth it! Stainless steel is also of good quality and will have a reasonable life.

     Here is a great link that describes pliers to the hilt: http://www.silversupplies.com/catalog/tools/pliers/

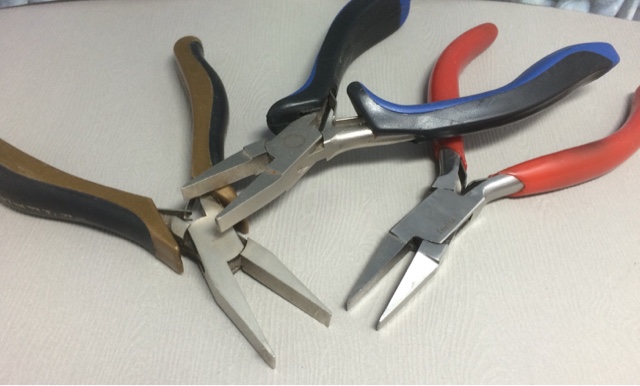
O.K. on to the basic tools for jewelry making which are: round and flat nose pliers plus flush cutters; optional are bent chain nose pliers. Then we have rulers, tape measures, Sharpies, and more.

3-in-1 or 4-in-1

If you are just starting out and want to save some money for supplies, or you are unsure of the type of jewelry you will make, or this is a hobby - BUY yourself some 3-in-1 or 4-in-1 pliers. These are inexpensive and will last awhile. I bought a pair of 4-in-1 pliers which are round/flat nose, cutters and have a groove to close jump rings.

These pliers lasted me years, and I still keep them around just in case.

ROUND NOSE PLIERS 

Round nose pliers have tapered jaws from pivot to tips. These are used to make various loops, S-hooks, jump rings, clasps, coils/spirals and curved bends, plus to form headpins and eyepins.

You will use this type of pliers the most, and despite what other sites say - I'd highly recommend buying the highest quality you can afford. I bought cheapie round nose pliers (according to so many people's recommendations.) Let me tell you - the cheap ones' tips dont match up, and this makes it extremely frustrating!

There are standard and long round nose pliers that you can get. The standard ones, you will use on a regular basis. The long round nose pliers are used to make coils. The longer the jaws on any type of pliers, the less control you have.

High-quality pliers to look for: Swanson (Rio Grande), Lindstrom, Wibbers, OHM and Euro Tool.

FLAT NOSE PLIERS 

Flat nose pliers have a flat interior surface inside the jaws and are used to hold components, open/close jump rings, make angular bends in wire and also to straighten and strengthen wire. Plus with flat nose pliers you can make spirals and close crimp covers. These also come in standard and long as well as narrow and wide. I have several types and use them for different applications.

CHAIN NOSE PLUERS

If you will be doing a lot of chain mail work, you should definitely invest in straight chain nose vs. bent chain nose pliers. 

With chain nose pliers, both jaws are semi-round with flat interior surfaces and taper at the end. They are used for holding components, opening and closing jump rings, and reaching into tight places. The tips on the bent chain nose pliers are angled, and these are perfect for holding wire when you wrap so you can see what you are doing.

I didn't buy bent chain nose pliers for a long time because I never really used the straight ones for anything. After I bought a pair of these, I cannot even fathom wire wrapping without them!

CUTTERS

The ones on the bottom are Lindstrom that were destroyed because I cut memory wire with them. The red handled flush cutters are from Ace Hardware and are of good quality. The cutters with the royal blue handles cut up to 14ga wire and metal.

Oh the joy of cutting! There are several types of cutters out there - definitely buy the highest quality you can afford! AND do NOT use them to cut memory wire!!!! Let me repeat that: DO NOT USE ANY TYPE OF CUTTERS other than Memory Wire Shears to cut memory wire. You will dull the cutters very quickly after one single use of cutting memory wire. 

Memory wire is a type of steel wire that retains its shape. You can only use Memory Wire Shears to cut this type of wire!

I have bought so many cheapie cutters over the years because I didn't want to invest $50.00 into a good pair of cutters... and then when I finally broke down and bought a pair of Lindstrom flush cutters - I used them to cut memory wire. Oh my golly gee - what a waste of $$$! I've never been able to use them again! The blades don't match up even though I had the blades sharpened. *sigh*

     • FLUSH cutters, also known as SIDE cutters: the jaws are pointed and angled, almost parallel to the handles. If you don't want a bur on the end of your piece of wire, you need to turn the pliers around so that the straight edge is away from the section of wire you are cutting. If you don't want to deal with this bur, buy a pair of super flush cutters.
     • END cutters: these type of cutters have blades perpendicular to the handles and provide more cutting leverage. Use these to make sharp, clean cuts close to the surface of wire.

The shears on the left are Memory Wire Shears and the cutters on the right are End Cutters.
     • OBLIQUE cutters: a type of end cutters that feature an angled head to allow you to cut hard-to-reach areas. Only use these to cut softer metals.
     • COMPOUND cutters: these are designed with two joints to maximize hand power when cutting thicker, heavier metals.

RULERS and TAPE MEASURES 


Make sure to have some of these handy. I'd get a metal ruler, a see-through ruler and of course a tape measure. Also look for rulers with standard and metric, preferably going in the same direction. Most rulers have these two but inches are left to right and centimeters is right to left. 


have rulers - metal, see-through, tape measures and a sticky ruler. The latter being on a roll, and I just pull off 12" and stick it to my workbench. I absolutely love this type of ruler!!! 

SHARPIES or other PERMANENT MARKERS 
I know it seems weird but Sharpies are magnificent tools! You can use them to mark the tips of your round nose pliers so that you can make consistent loops and also use them as a mandrel. 

BEAD MAT


This, of course, is optional. A bead mat protects your work surface and also keeps beads and components from sliding around. 

#BasicToolsJewelryMaking #JewelryMakingTools #PliersAndCutters


Tools for Wire and Metal Work

Greetings dear friends! 

In my last blog: Basic Tools for Jewelry Making, I went over round nose, flat nose, chain nose pliers along with flush cutters and memory wire shears; this blog will delve into books and tools I use specifically for working with wire W and metal M.

I do not do any soldering so I did not include any tools for this medium.

BOOKS W

Sharilynn Miller is, by far, my most favorite mentor when it comes to learning about wire. Her books are easy to understand and the images are fantastic! 

"Bead on a Wire" is the first book I ever purchased, and it goes over the basics, along with projects to develop your new learned skills.


Here are her other books that I have:


Another great book for learning how to make bangles from wire is:


BOOKS M


This book is a must-have for any of you who will be working with metal - Mark Lareau goes over tools, how to saw, stamp and solder.


MAGAZINES W M


Both Wire Jewelry and Art Jewelry are publications with a variety of skill levels and projects to learn while doing. Both have soldering projects too.

TOOL MAGIC 


This is actually a thick white rubbery substance that coats your pliers so that you don't mar the metals that you are working on. It has a very strong odor so be sure to use in a ventilated area.

How To Use: 
Stir the substance until the oil is not sitting on top and then dip the tips of your pliers in, avoiding the joint. Stand pliers upright and let dry overnight. Voilà  - coated pliers! 

Why this instead of nylon coated? Nylon coated flat nose pliers work well enough and I actually prefer nylon over Tool Magic for flat nose pliers as the wire slips more readily between the jaws of the nylon coated pliers, but nylon coated round nose pliers? Argh! Tool Magic is definitely better as you have a better grip on the wire.

SAFETY GLASSES


Any time you work with wire or metal, always don on a pair of safety glasses. I wear regular glasses and also have a pair of safety glasses - which I don't always wear, BUT it is important to protect your eyes from flying bits of wire and metal.

MASKS
If you will be working with a Dremel or Flexshaft, I'd highly recommend putting on a mask to protect your lungs.

FLAT/HALF ROUND and SQUARE MANDREL FORMING PLIERS W


These two types of pliers are great when you want to make multiple wire strand bracelets. It's easier to use these as they are specifically designed for this type of wire bending.

STEPPED WRAP and TAP PLIERS W


I bought these first for wrapping wire until I bought the bail-forming pliers. The wrap and tap pliers are ideal for hollow or patterned stock. Simply wrap the wire or ring stock around the barrel shapes and then tap gently with a mallet.

BAIL FORMING PLIERS W


Love, love, LOVE these pliers!!! These pliers have six different sized barrels in 2 and 3mm, 3.5 and 5.5mm, 7 and 9mm. You can make a variety of consistent loops, S-hooks, bails, etc. 

My bail-forming pliers are from Euro Tool.

FILES W, M


Even if you have a Dremel or Flex Shaft, you will still need some high-quality files on hand. Which ones to get? My first file was a Craftsman file, and I still use it now! I'd suggest getting a large flat file and also a set of needle files: round, half-round, and barrette. 

When using files, it is best to add a coating of lubricant to keep file teeth sharp and always file in one direction. If you are using diamond encrusted titanium files, you can file in both directions, but I'd still suggest one direction for optimal results.

I'd also recommend getting a file-cleaning brush and always clean your files after using them.

SANDING and POLISHING W M


In the image above, there are wet-dry sanding papers, sanding blocks/needles and the white squares are Pro-Polishing pads.

When buying sanding paper, needles, or blocks make sure you get a variety of grits.

HAMMERS and MALLETS W, M
Buy yourself a chasing hammer and rubber mallet to start out. You will use the chasing hammer to work-harden your wire, and you can also add a beautiful texture by using the ball end. A mallet also work-hardens wire without marring the metal. 

When choosing a mallet - go for weight and durability. I have a Craftsman that has both a nylon head and hard rubber head. (I have bought other mallets in the past that were too light to do anything with.)

     • Chasing Hammer, W

This type of hammer has one flat faced head and one round head. The fat surface is used for chasing other tools and to work-harden wire. The round end is for riveting, peening, adding texture and more. 

If you are going to use metal stamps, I'd suggest buying another chasing hammer for this type of work or getting a copper or brass head hammer. By using your chasing hammer for stamps and then turning around and using it to harden wire - it'll produce nicks in the wire. (Not pretty.)

     • Ball Peen Hammer, W M


This hammer has two ends: one flat face and one half-domed face. Use the flat end for striking and the half-domed end for riveting, shaping and spreading unhardened metal.

     • Riveting Hammer, W

This hammer is specifically for riveting.

     • Texturing Hammer, W M

Get a hammer that has multiple faces with different patterns. There are some hammers without interchangeable faces, and you can certainly get these too, but the ones with the interchangeable faces are awesome! Simply screw on the patterned face you want and voila - instant texture. 

     • Brass or Copper Head Hammer, M

These hammers are used to reduce sparks when working with gold and silver. I use my brass head hammer for metal stamps.

     • Rawhide Mallet W

This mallet is very lightweight and is great for hammering rings or bracelets on a mandrel.

     • Nylon/Rubber Head Mallet W M
 When you do purchase one of these, I'd recommend buying a heavy weight one like this Craftsman that I have. The cheaper ones are 2oz which do nothing!

STEEL BENCH BLOCK 


When hammering, you want to hammer on a strong sturdy surface hence the steel bench block. You can also use a sandbag underneath the steel bench block so that the block doesn't move around.

It is not recommended to use the sandbag underneath the block when you are stamping. Your stamp will not produce a sharp image.

DAPPING BLOCK and DAPPING PUNCH SET M

A dapping block is used to shape softer metals into half rounds by placing the metal into the concave depressions and striking the hammer on the dapping punch. These come in either steel or wood. 

I bought mine by accident, thinking it was a disk cutter, but have used it quite a bit. 

DISK CUTTER, M

These come in multiple shapes now: round, oval, square, heart, star, etc. You definitely want to use some lubricant when cutting with these. You also need a chasing hammer or brass/copper head hammer and a steel bench block. 

How To Use: place the metal in the groove (remove all the punches) and then coat the cutting edge of the punch with lubricant. After the sheet of metal is in the groove, strike the punch with a hard blow and then remove the metal sheet. Strike the punch again so it goes through the hole.

VICES and ANVILS M W
     • A VISE has two jaws that hold metal or wire in a stronghold grip. I'd recommend getting a table vise that swivels. Some vices come with an avil but I don't think this is necessary as long as you have a steel bench block.

     • ANVIL- these usually have a flat surface for hammering metal and wire along with a horned end for shaping and forming.

     • BENCH PIN COMBO - this clamps to your work surface and has a slotted wood bench pin for use in sawing and/or filing, a ring and bracelet mandrel and also the steel base allows you to hammer components.


JEWELER'S SAW and BLADES M


Before using these - watch video tutorials and buy quality saw blades, like Laser from Rio Grande. Plus practice on cheap sheet metal before using semi-precious or precious metals.

There is a finesse involved when sawing... it can be frustrating, but stick with it!

ROTARY TUMBLER W M


The final stage of polishing your metal is with a rotary tumbler. You will need these as well:
     • Burnishing compound (Rio Grande)
     • Stainless Steel Shot Mix - 2lbs 
     • Distilled Water

STEEL WOOL W M


Steel wool is inexpensive and works like a charm for cleaning wire and metal. Plus the steel wool also work-hardens wire too.

WIRE GAUGE W M


This simple tool measures wire and sheet metal thickness by the gauge. Important to have when you are unsure of what the gauge is of the wire or sheet metal you are working on.

WIRE ROUNDER W


If you get this, buy the type that has a pin vise so you can exchange the wire-rounding cup burrs. This tool is very helpful for rounding the ends of cut wire as filing the ends will only make them flat, whereas by using this tool - you will have beautiful rounded wire ends.

WIG JIG W


This interesting tool has an acrylic or aluminum base with lots of tiny holes in a square or circular fashion. The pegs are inserted into the holes for repetitive wire patterns. 

You can check out the website, https://www.wigjig.com/wigjigs/1674-wigjig-templates for hundreds of free pattern templates.

COILING GIZMO W

Between the regular and deluxe models, get the latter as there are more rod diameters to choose from. You can either put this in a vise or C-clamp.

CENTER PUNCH and SCRIBE M

    Left to right: Center Punch and Scribe

A center punch is used to make an indentation in metal for drilling or you can also use a pair of hole punch pliers.

A scribe is used to mark metal for either sawing or cutting. You can also use a Sharpie marker but the "permanent" ink tends to rub off at the worst times.

WIRE TWISTER W


You will need a vise with these locking wire twisters, or you can use a drill to twist wire quicker. To use the locking wire twisters: simply place wire ends in vise and the other end, folded over, into the jaws of the locking pliers. Lock the handles in place and then standing with the wires taut, pull out knob and hold pliers. Repeat until one end breaks off. I tend to just sprint the pliers in my hand as the knob on these pliers doesn't work well with higher number gauges.

BENCH KNIFE W


This knife is handy when spreading wires.

WOODEN RING CLAMP M


This doo-dad is great for holding small components for drilling, filing and polishing. It has one square end and the other end is rounded. The wedge keeps your component in place. (Mine has leather inside both ends.)

HOLE PUNCH PLIERS and TOOL M


These above tools are for punching holes in softer metals. If you are going to punch holes in stronger metals, I'd suggest drilling the holes. These tools have replacement pins.

STEEL STAMPS M


Steel stamps come in letters, numbers, punctuation marks and whimsical characters. The stamp to the left has a purple Sharpie mark shown (all of my stamps have this) to show me which direction to use the stamp. I'd suggest marking your stamps as such so you don't accidentally stamp upside down.


DREMEL or FOREDOM 


I have a Dremel that I'm still learning all of its uses. I bought this over a Foredom because of the price, and also because Dremel attachments are sold everywhere. Here's a great article on Dremel vs Foredom: http://www.bonejeweler.com/2014/11/dremel-or-foredom/


VIKING KNIT TOOL W


Viking knit is a type of knot knitting done with wire. There are several tools used for Viking knitting:
     • Lazee Daizee wire weaving rod
     • Draw plate and felted cloth
     • Pin tool
     • Lazee Daizee book


I'm sure there are lots more tools out there for working with both metal and wire, but these are the tools I use.

LIVER OF SULFUR W M


These two products work in the same way: adding a patina to your finished metal and wire projects. Read the directions and use in a well-ventilated area as the odor of sulfur smells like rotten eggs. Peeewww!


#ToolsForWire #ToolsForMetalsmithing #WireAndMetalsmithingTools

Next Up: Wired in Jewelry Wire

***ADDITIONAL BLOG MATERIAL***

"The Workbench Guide to Jewelry Techniques" by Anastasia Young IS a complete and very thorough book of everything you could possibly ever imagine.